Organizing my Dies


How are you storing your dies? Have you outgrown your system? This is the predicament that I faced. My old system relied on baseball trading card page protectors in a zippered notebook. I really liked being able to see several dies on a page but that created problems when there was "a series" of dies and they definitely couldn't be put in alphabetical order without a lot of shifting.


The new system starts with Memorex Keepers. A clear CD & DVD pouch. They are sold in a 50pk for $9.99. I found them at Staples and Office Depot. I cut a 4 1/2" square of Georgia Pacific card stock for each pouch.

(TIP: If you decide to use these I would suggest a  4 1/4" square instead so that you could get 4 pieces from each sheet. I didn't think that through and I just couldn't change midstream.)


Next I used my trusty Brother P-Touch label maker to put the name of the die on the paper. I made sure to put how many dies were in the collection. 


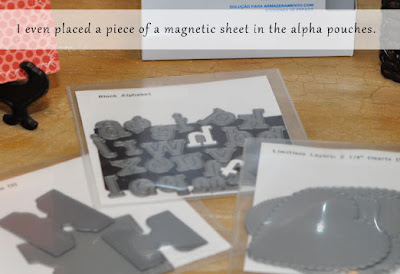
I also put a piece of a magnetic sheet in each pouch that contains an alpha or number set. Did I mention that each pouch has a back flap so you don't lose anything?


For collections that have different blooms for example, I traced around the die and labeled them on the page.


I was really surprised at how many of my dies fit the pouch. Even the tiny envelope die that is pretty large fit.

 
I made dividers using lots of different pattern papers. This is a great way to use up the stash. I cut two 5" squares of patterned paper. I sewed them together with the journal tab that I had die cut and stamped the letter with Fresh Alphabet from PTI. I think they are the perfect weight and look cute too. 


I have categorized my dies alphabetically by company. I briefly considered grouping them by floral, etc. but decided my brain doesn't work that way. 

The final piece of this project was the container. I found what I think is the piece that makes it all work-- the perfect file box at Target in the bathroom area. The reason this box is so perfect is the size 3 1/4" x 10". At 3 1/4" it allows me to flip through the box. I tried higher sides but that made them hard to see.The length is great for being able to stick in a cabinet or leaving out on your work area. There are over 100 pouches in this container. Yeah, UM, I know. I have too many dies!


I smile each time I spy my little box of dies in my craft room. I hope you have a beautiful week. ~Rhonda

PS - Want to know what I did with the long dies such as the scallop border dies? Tune in next Monday for another installment of die organization.

Love You - January 2013 PTI Blog Hop


It's time once again for the Papertrey Ink Blog Hop. The challenge is to turn our creativity towards black! You can see what everyone is creating at Nicole Heady's blog here. I starting by pulling out anything that I thought would work for a Valentine theme. I had a pretty big mess going as you will see.

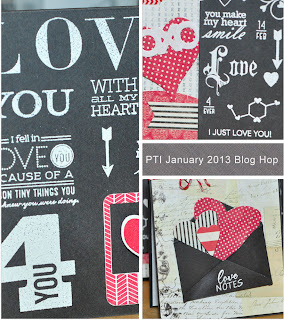
First up is a card that uses the chalkboard technique. This was my first time to try this and it certainly won't be my last. I had FUN! This is great for using stamps from lots of different sets.


This second card uses black as one of the main elements. The tiny envelope is bursting with hearts. 


Do you like the way I tied my heart?


My last card again used the blackboard technique. Have you picked up Authentique's Lovely Collection paper pad yet? Great papers.


The X & O's are from the Papertrey Ink border die. I also used the In the Meadow die for the heart paper behind the sentiment layer.


This last picture shows ALL the fun I will be having as I clean my craft room. If you look closely at the picture you might spy my new die storage. If you are interested I will be posting more about it on Monday, January 28th. So stop back by. 


Happy Hopping! ~Rhonda

Love You supplies
stamps: PTI - Sending My Love, Heart-2-Heart #3, Framed Out #5, Framed Out #12; MFT - Gift Card Greetings; Verve - Love Notes
ink: PTI - Pure Poppy; Versamark
paper: PTI - Smokey Shadow, Stamper's Select White
dies: PTI - Framed Out #12
other: white embossing powder

XOXO supplies
stamps: PTI - With All My Heart, Love Potion, Just the Ticket, Framed Out #5; Verve - Sweet Treats, Love Notes
ink: PTI - Fresh Snow; Versamark
paper: PTI - Pure Black, Smokey Shadow; Authentique Collection: Lovely
dies:PTI - XO Border, In the Meadow; MFT - Fishtail Flags, Vertical Greetings; Verve - Wavy Hearts
other: Ranger Distress Crackle paint - Picket Fence; Tattered Angels - Glam Glitter Paint; Mini Wooden Clothespins; Washi Tape - Pick your Plum

Love Notes supplies
stamps: Verve - Love Notes
ink: Versamark
paper: PTI Pure Black, Smokey Shadow; Authentique Collection: Lovely
dies: PTI - Tiny Envelope; Verve - Jotted Heart, Wavy Hearts, From the Heart
other: Twiney twine

Christmas Thank You


 I needed to get my Christmas thank you's completed. I usually like to get them completed the 1st week of January but as so many others, I was under the weather! I still have a cough that I can't shake.


This is a simple, easy layout that allowed my to use some busy paper that I normally have trouble with. A little twine and an embossed sentiment made this one easy to mass produce.

Hope you are enjoying beautiful weather. We are in the 70's for at least another day. It was a perfect day for a walk. ~Rhonda

Easy Garlic Chicken


How about an easy dinner? This is a recipe I found through Pinterest. Frankly it is getting mixed reviews but we enjoyed it. Just be careful when sauteing the garlic and oil. My husband had to do it a second time because it came together so quickly. Another tip would be to line your baking dish with foil. The clean-up was NOT so easy as you can see in the picture above. 

Happy Cooking! ~Rhonda

Easy Garlic Chicken - serves 4
Ingredients:
4 boneless skinless chicken breasts
4 garlic cloves, minced
4 tablespoons brown sugar
3 teaspoons olive oil

Directions:

1. Preheat oven to 500°F and lightly grease a casserole dish.
2. In small sauté pan, sauté garlic with the oil until tender.
3. Remove from heat and stir in brown sugar.
4. Place chicken breasts in a prepared baking dish and cover with the garlic and brown sugar mixture.
5. Add salt and pepper to taste.
6. Bake uncovered for 15-30 minutes.


A Tuesday Tip - Induction Non-stick Frypan


How about a Tuesday Tip? I am always so thankful to learn something new that helps make something a little easier or to get the Ah Ha moment! It could be a new recipe from Pinterest, a tutorial or a new product or .... you get the picture.


My tip today is for everyone who has an induction cook top (works on regular cook tops too) and wants to make a grilled cheese sandwich! We remodeled our kitchen this last year and installed an induction cook top which means you must use cookware that a magnet will stick too. We couldn't find a frypan that was non-stick induction suitable under $150.

Well, my husband and I were killing time in Bed, Bath, and Beyond when we stumbled upon Twiztt by Joan Lunden. Apparently she launched a new cookware line in March 2012. We brought the 10" stainless steel frypan with Ceramic Non-stick home. Only $39.99.

LOVE. LOVE at first bite! I can make a grilled cheese or egg sandwich again. Yep, its the little things. ~Rhonda

Have a tip to share? It can be on anything! Link up below.

Today is the first day


I love this sentiment. This is one you could wake up saying each day. Would it change your day?

I used PTI's new Funky Florals set. I already had the notched flower dies and was happy to add stamps that matched. I put a little dot on the back of each of the flower stamps to help me line them up with the dies. 


Another die set that I am using alot is MFT's Fishtail Flags. The different sizes and the ease of cutting makes them a go-to item. 

Have a great day! ~Rhonda


supplies used:
stamps: MFT Clearly Sentimental New Beginnings; PTI Funky Florals, Turning a New Leaf
paper: My Mind's Eye Lost & Found 3; PTI Terracotta Tile, Simply Chartreuse, Kraft, Stamper's Select White;
ink: Versa Mark, Enchanted Evening
other: PTI Turning a New Leaf die, Notched Flowers die; MFT Fishtail Flags Stax dies

Happy 2013!


Happy New Year Family and Friends! I found a few quotes that I hope you will enjoy. ~Rhonda


A happy New Year! Grant that I
May bring no tear to any eye
When this New Year in time shall end
Let it be said I've played the friend,
Have lived and loved and labored here,
And made of it a happy year.
~Edgar Guest


Approach the New Year with resolve to find the opportunities hidden in each new day. 
 ~Michael Josephson


Glory to God in highest heaven,
Who unto man His Son hath given;
While angels sing with tender mirth,
A glad new year to all the earth.
~Martin Luther  

Be at War with your Vices, at Peace with your Neighbors, and let every New-Year find you a better Man.  ~Quoted in Benjamin Franklin's 1755 Poor Richard's Almanac 

We will open the book.  Its pages are blank.  We are going to put words on them ourselves.  The book is called Opportunity and its first chapter is New Year's Day.  
~Edith Lovejoy Pierce 

People are so worried about what they eat between Christmas and the New Year, but they really should be worried about what they eat between the New Year and Christmas.  ~Author Unknown


Powered by Blogger.

Keep In Touch

Subscribe via Email

Enter your email address:

About Me

My photo
Texas, United States
Life is full of interesting pieces. I am grateful that I can combine my love of stamping, organization, and DIY projects.

BeStill52

KIM KLASSEN dot COM

Followers

Grab My Button

Blog Archive

Mojo Monday Blinkie